Setting Up Box3D and Raylib in CLion with CMake and MinGW Настройка Box3D и Raylib в CLion с использованием CMake и MinGW
Setting up tools using these guides: Установите инструменты по инструкциям:
- C/C++ Environment Setup with CLion, CMake, and MinGW Настройка окружения C/C++ в CLion, CMake, и MinGW
- Building Box3D from Source (MinGW) Сборка Box3D из исходного кода (MinGW)
- Installing prebuilt Raylib from GitHub Releases for use with CMake and MinGW Установка готовой сборки (prebuilt) Raylib из раздела Releases на GitHub для использования с CMake и MinGW
Create a C or C++ project in CLion Создайте C или C++ проект в CLion
-
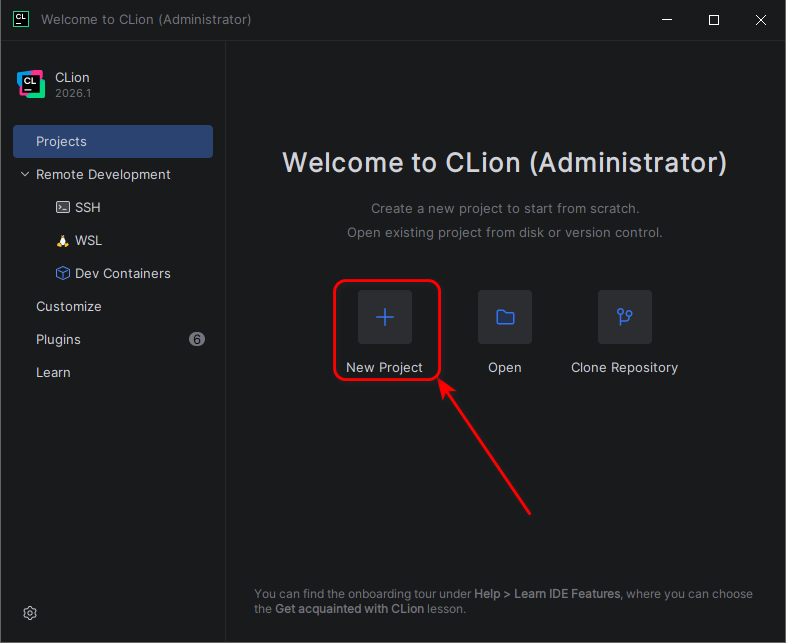
Run CLion and click on the
New Project button:
Запустите CLion и нажмите на кнопку New Project:
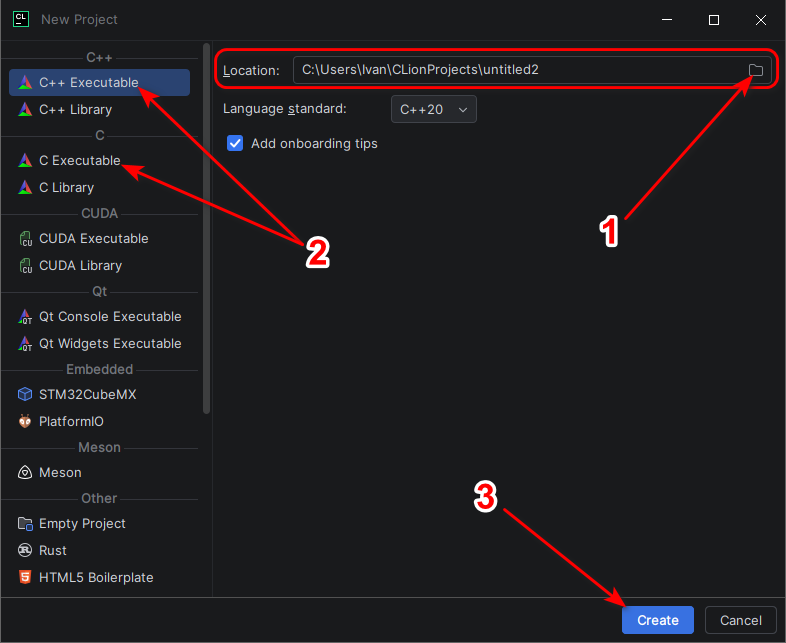
You can select a Locaton (1) and a type of project (2) - C or C++: Вы можете выбрать расположение проекта - Locaton (1) и тип проекта (2) - C или C++:
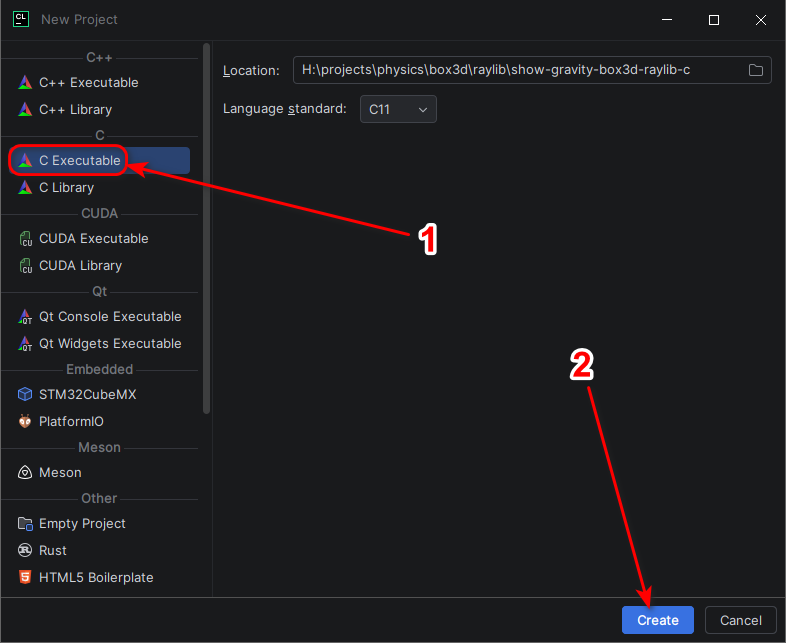
Let's select a C project and click the Create button:
Давайте выберем проект на C и нажмем кнопку Create:
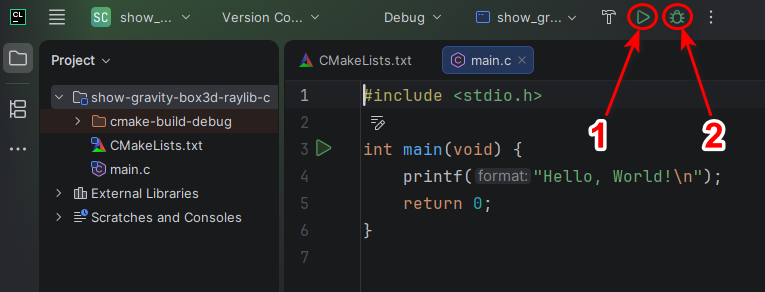
You can click the Run (1) or Debug (2) button to test the project launch and ensure that everything is working:
Вы можете нажать кнопку Run (1) или Debug (2), чтобы протестировать запуск проекта и убедиться, что всё работает:
Setting up Box3D and Raylib in the CMakeLists.txt file
Настройка Box3D и Raylib в файле CMakeLists.txt
Replace the contents of the CMakeLists.txt file with the following code:
Замените содержимое файла CMakeLists.txt следующим кодом:
set(CMAKE_BUILD_TYPE "Debug")

cmake_minimum_required(VERSION 3.21)
project(show-gravity-box3d-raylib-c)

add_executable(app)

target_include_directories(app PRIVATE C:/libs/raylib-6.0_win64_mingw-w64/include)
target_link_directories(app PRIVATE C:/libs/raylib-6.0_win64_mingw-w64/lib)

target_include_directories(app PRIVATE C:/libs/box3d-0.1.0-mingw/include)
target_link_directories(app PRIVATE C:/libs/box3d-0.1.0-mingw/lib)

target_sources(app
    PRIVATE
    main.c
)

target_link_libraries(app PRIVATE box3d raylib winmm)
target_link_options(app PRIVATE -static)
Replace the contents of the main.c file with the following code:
Замените содержимое файла main.c следующим кодом:
#include <box3d/box3d.h>
#include <raylib.h>

// Global or persistent data
b3WorldId worldId;

void InitGame()
{
    InitWindow(800, 450, "Raylib and Box3D");
    SetTargetFPS(60);

    b3WorldDef worldDef = b3DefaultWorldDef();
    worldDef.gravity = (b3Vec3){ 0.0f, -9.8f, 0.0f };
    worldId = b3CreateWorld(&worldDef);
}

void UpdateGame()
{
    // Handle game logic updates here
}

void DrawGame()
{
    b3Vec3 g = b3World_GetGravity(worldId);

    BeginDrawing();
    ClearBackground(RAYWHITE);

    DrawText(TextFormat("Gravity is: (%0.1f, %0.1f, %0.1f)", g.x, g.y, g.z), 190, 200, 20, DARKGRAY);

    EndDrawing();
}

void ShutdownGame()
{
    b3DestroyWorld(worldId);
    CloseWindow();
}

int main()
{
    InitGame();

    while (!WindowShouldClose())
    {
        UpdateGame();
        DrawGame();
    }

    ShutdownGame();

    return 0;
}
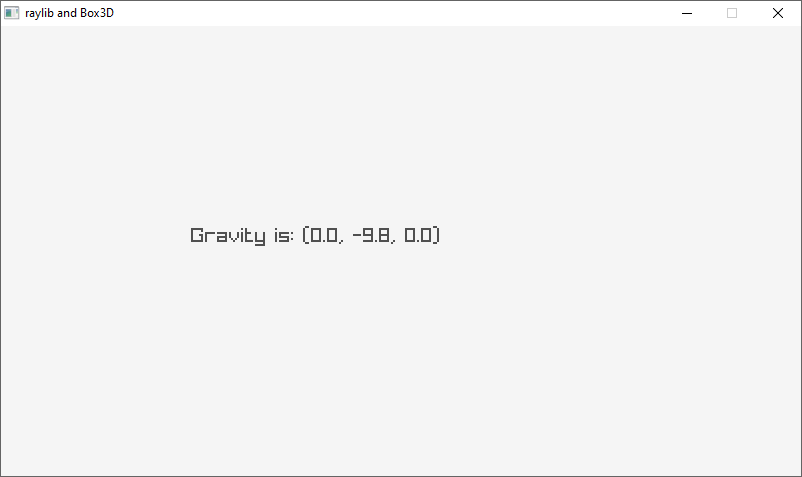
When you run the example above, you will see the following result: Когда вы запустите пример выше, вы увидите следующий результат:
Support My Work Поддержать проект
If these tutorials helped you, consider buying me a coffee! Если эти туториалы вам помогли, вы можете поддержать автора.
Sberbank (Russia only) Сбербанк (только для РФ)

Direct transfer via phone number (Russia only) Перевод по номеру телефона (только для РФ)
USDT TRC20

Support via Cryptocurrency Поддержка криптовалютой