SDL3 Desktop: SDL3_image Setup (MinGW 13.1) SDL3 для Desktop: Настройка SDL3_image (MinGW 13.1)
A guide to configuring the SDL3_image extension library with CMake and MinGW. Руководство по настройке библиотеки расширения SDL3_image с использованием CMake и MinGW.
1. Obtain SDL3_image 3.4.4 1. Получение SDL3_image 3.4.4
-
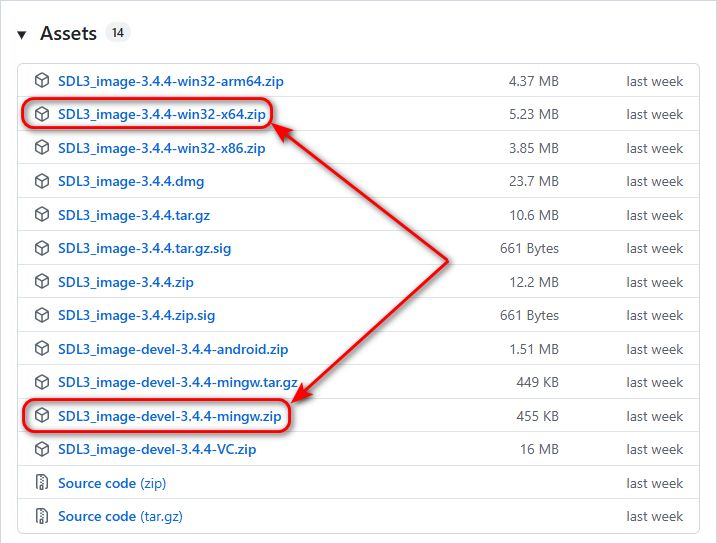
Download two archives from the official release page:
Скачайте два архива со страницы официального релиза:
-
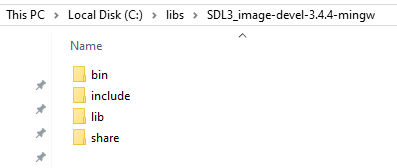
Extract the SDL3_image-devel-3.4.4-mingw.zip archive to the
C:/libs/SDL3_image-devel-3.4.4-mingwfolder. Распакуйте архив SDL3_image-devel-3.4.4-mingw.zip в папкуC:/libs/SDL3_image-devel-3.4.4-mingw. -
Move the headers and libraries so the structure is
SDL3_image-devel-3.4.4-mingw/include, etc: Переместите заголовочные файлы и библиотеки так, чтобы структура папок былаSDL3_image-devel-3.4.4-mingw/includeи т. д.:
-
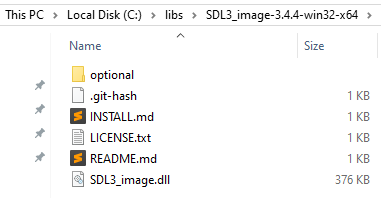
Extract the SDL3_image-3.4.4-win32-x64.zip archive so the path is exactly
C:/libs/SDL3_image-3.4.4-win32-x64: Распакуйте архив SDL3_image-3.4.4-win32-x64.zip так, чтобы путь был именноC:/libs/SDL3_image-3.4.4-win32-x64:
2. Add SDL3 to Environment Variables (Path) 2. Добавление SDL3 в переменные среды (Path)
To ensure your applications can find the SDL3.dll file at runtime, you should add the following path to the Path variable in your User variables section:
Чтобы приложения могли находить SDL3.dll файл при запуске, добавьте следующий путь в переменную Path в разделе Переменные среды пользователя:
C:\libs\SDL3_image-3.4.4-win32-x64
3. Project Structure and Assets 3. Структура проекта и ресурсы
Before creating the files, download the required asset: Перед созданием файлов скачайте необходимый ресурс:
- Download the PNG file with transparent background: right-arrow.zip Скачайте PNG-файл с прозрачным фоном: right-arrow.zip
- Note: This is a free file taken from this link. Примечание. Это бесплатный файл, который был взят по ссылке.
C Project: Create an empty folder named image-sdl3-c and set up the following hierarchy by creating new CMakeLists.txt and main.c files:
Проект на C: Создайте пустую папку с именем image-sdl3-c и подготовьте следующую иерархию, создав файлы CMakeLists.txt и main.c:
image-sdl3-c/
├── CMakeLists.txt
├── assets/images/
│   └── right-arrow.png
└── src/
    └── main.c
C++ Project: Create an empty folder named image-sdl3-cpp and set up the following hierarchy by creating new CMakeLists.txt and main.cpp files:
Проект на C++: Создайте пустую папку с именем image-sdl3-cpp и подготовьте следующую иерархию, создав файлы CMakeLists.txt и main.cpp:
image-sdl3-cpp/
├── CMakeLists.txt
├── assets/images/
│   └── right-arrow.png
└── src/
    └── main.cpp
4. CMake Configuration 4. Конфигурация CMake
C Project: Copy and paste the following code into the CMakeLists.txt file:
Проект на C: Скопируйте и вставьте следующее содержимое в файл CMakeLists.txt:
set(CMAKE_BUILD_TYPE "Debug")
cmake_minimum_required(VERSION 3.21)
project(image-sdl3-c)

set(SDL3_DIR "C:/libs/SDL3-devel-3.4.8-mingw/lib/cmake/SDL3")
set(SDL3_image_DIR "C:/libs/SDL3_image-devel-3.4.4-mingw/lib/cmake/SDL3_image")

find_package(SDL3 REQUIRED)
find_package(SDL3_image REQUIRED)

add_executable(app)
target_sources(app PRIVATE src/main.c)

# Copy the assets folder to the dist folder
if(EXISTS "${CMAKE_SOURCE_DIR}/assets")
    add_custom_command(TARGET app POST_BUILD
        COMMAND ${CMAKE_COMMAND} -E copy_directory
                "${CMAKE_SOURCE_DIR}/assets"
                "$<TARGET_FILE_DIR:app>/assets"
        COMMENT "Copying assets directory"
    )
endif()

target_link_libraries(app PRIVATE SDL3_image::SDL3_image SDL3::SDL3)
target_link_options(app PRIVATE -mconsole)
C++ Project: Copy and paste the following code into the CMakeLists.txt file:
Проект на C++: Скопируйте и вставьте следующее содержимое в файл CMakeLists.txt:
set(CMAKE_BUILD_TYPE "Debug")
cmake_minimum_required(VERSION 3.21)
project(image-sdl3-cpp)

set(SDL3_DIR "C:/libs/SDL3-devel-3.4.8-mingw/lib/cmake/SDL3")
set(SDL3_image_DIR "C:/libs/SDL3_image-devel-3.4.4-mingw/lib/cmake/SDL3_image")

find_package(SDL3 REQUIRED)
find_package(SDL3_image REQUIRED)

add_executable(app)
target_sources(app PRIVATE src/main.cpp)

# Copy the assets folder to the dist folder
if(EXISTS "${CMAKE_SOURCE_DIR}/assets")
    add_custom_command(TARGET app POST_BUILD
        COMMAND ${CMAKE_COMMAND} -E copy_directory
                "${CMAKE_SOURCE_DIR}/assets"
                "$<TARGET_FILE_DIR:app>/assets"
        COMMENT "Copying assets directory"
    )
endif()

target_link_libraries(app PRIVATE SDL3_image::SDL3_image SDL3::SDL3)
target_link_options(app PRIVATE -mconsole)
5. Source Code 5. Исходный код
Copy and paste the following code into the src/main.c (or src/main.cpp) file:
Скопируйте и вставьте следующее содержимое в файл src/main.c (или src/main.cpp):
src/main.c (or src/main.cpp)
#define SDL_MAIN_USE_CALLBACKS 1
#include <SDL3/SDL.h>
#include <SDL3/SDL_main.h>
#include <SDL3_image/SDL_image.h>

static SDL_Window *window = NULL;
static SDL_Renderer *renderer = NULL;
static SDL_Texture *texture = NULL;

SDL_AppResult SDL_AppInit(void **appstate, int argc, char *argv[]) {
    if (!SDL_Init(SDL_INIT_VIDEO)) return SDL_APP_FAILURE;

    if (!SDL_CreateWindowAndRenderer("SDL3 Image C", 250, 250, SDL_WINDOW_RESIZABLE, &window, &renderer)) {
        return SDL_APP_FAILURE;
    }

    const char *texturePath = "assets/images/right-arrow.png";
    texture = IMG_LoadTexture(renderer, texturePath);
    if (!texture) {
        SDL_Log("Load failed: %s", SDL_GetError());
        return SDL_APP_FAILURE;
    }
    return SDL_APP_CONTINUE;
}

SDL_AppResult SDL_AppEvent(void *appstate, SDL_Event *event) {
    if (event->type == SDL_EVENT_QUIT) return SDL_APP_SUCCESS;
    return SDL_APP_CONTINUE;
}

SDL_AppResult SDL_AppIterate(void *appstate) {
    SDL_SetRenderDrawColor(renderer, 100, 100, 100, 255);
    SDL_RenderClear(renderer);

    SDL_FRect srcRect = { 0, 0, 512, 512 };
    SDL_FRect destRect = { 50, 50, 100, 100 };
    SDL_RenderTexture(renderer, texture, &srcRect, &destRect);

    SDL_RenderPresent(renderer);
    return SDL_APP_CONTINUE;
}

void SDL_AppQuit(void *appstate, SDL_AppResult result) {
    SDL_DestroyTexture(texture);
}
6. Opening the Project in IDEs 6. Открытие проекта в IDE
Open the CMakeLists.txt file in CLion or Qt Creator. CMake will handle the rest. Откройте файл CMakeLists.txt в CLion или Qt Creator. CMake позаботится об остальном.
7. Automation Scripts (.bat) 7. Скрипты автоматизации (.bat)
You can open the project folder in Sublime Text 4 (or Notepad++). Create the following .bat scripts in the project root directory to automate the configuration, building, and running of your application:
Вы можете открыть папку проекта в Sublime Text 4 (или Notepad++). Создайте следующие .bat скрипты в корневой директории проекта для автоматизации конфигурации, сборки и запуска вашего приложения:
1. config-exe.bat
cmake -G "MinGW Makefiles" -S . -B dist/exe2. build-exe.bat
cd dist\exe
cmake --build .
cd ..\..
3. run-exe.bat
dist\exe\appTo build and launch the application, run these scripts in the terminal in the following order:
Чтобы собрать и запустить приложение, выполните эти скрипты в терминале в следующем порядке:
config-exe
build-exe
run-exe
Support My Work Поддержать проект
If these tutorials helped you, consider buying me a coffee! Если эти туториалы вам помогли, вы можете поддержать автора.
Sberbank (Russia only) Сбербанк (только для РФ)

Direct transfer via phone number (Russia only) Перевод по номеру телефона (только для РФ)
USDT TRC20

Support via Cryptocurrency Поддержка криптовалютой