C/C++ Environment Setup with Qt Creator (No Qt Framework) Настройка окружения C/C++ в Qt Creator (Без фреймворка Qt)
1. MinGW 13.1 (WinLibs) 1. MinGW 13.1 (WinLibs)
Go to winlibs.com. Download the GCC 13.1.0 release (Win64, POSIX threads, SEH exceptions):
Перейдите на winlibs.com. Скачайте версию GCC 13.1.0 (Win64, POSIX threads, SEH exceptions):

C:\mingw64_13.1
Установка: Извлеките папку по простому пути без пробелов, например: C:\mingw64_13.1.
2. Path Configuration 2. Настройка переменных окружения
Add the MinGW bin folder to your System Path to use g++ and make in any terminal.
Добавьте папку bin вашего MinGW в системную переменную Path, чтобы использовать g++ и make в любом терминале.
# Add this to your System PATH:
C:\mingw64_13.1\bin
3. CMake Installation 3. Установка CMake
Download the Windows x64 Installer (.msi) from the Official CMake Website.
Скачайте установщик Windows x64 (.msi) с официального сайта CMake.
4. Standalone Qt Creator Installation 4. Установка автономного Qt Creator
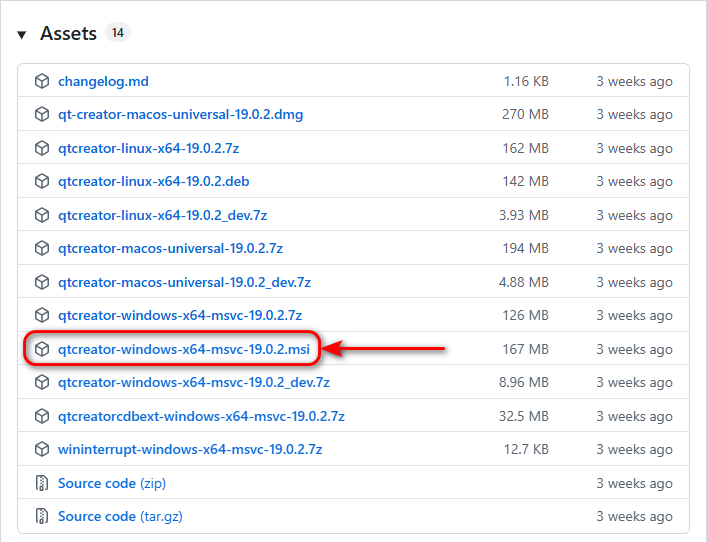
To get the IDE without installing the massive Qt Framework, search Google for qt creator github or go directly to the GitHub releases page. While you might notice the newer v20.0.0-beta2 release available, we will use the stable v19.0.2 release for this setup.
Чтобы получить IDE без установки массивного фреймворка Qt, введите в поиске Google qt creator github или перейдите на страницу релизов GitHub. Вы можете заметить доступную версию v20.0.0-beta2, но для этой настройки мы будем использовать стабильную версию v19.0.2.
Download the Windows installer (e.g., qtcreator-windows-x64-msvc-19.0.2.msi) directly from the Official GitHub Release Link and run it to complete the installation.
Скачайте установщик для Windows (например, qtcreator-windows-x64-msvc-19.0.2.msi) напрямую по официальной ссылке релиза GitHub и запустите его для завершения установки.
C:\Program Files\qtcreator-19.0.2\bin\, right-click qtcreator.exe, and create a shortcut or pin it to your taskbar.
Примечание: Если Qt Creator не появился в меню "Пуск" после установки, перейдите в папку C:\Program Files\qtcreator-19.0.2\bin\, нажмите правой кнопкой мыши на qtcreator.exe и создайте ярлык или закрепите его на панели задач.
5. Manual Configuration in Qt Creator 5. Ручная настройка в Qt Creator
Since we didn't use the Qt Installer, we must manually tell Qt Creator where our MinGW compiler, debugger, and CMake tools are located. Open Qt Creator and navigate to Edit > Preferences. Так как мы не использовали официальный онлайн-установщик Qt, нам нужно вручную указать Qt Creator, где находятся компилятор MinGW, отладчик и инструменты CMake. Откройте Qt Creator и перейдите в Edit > Preferences.
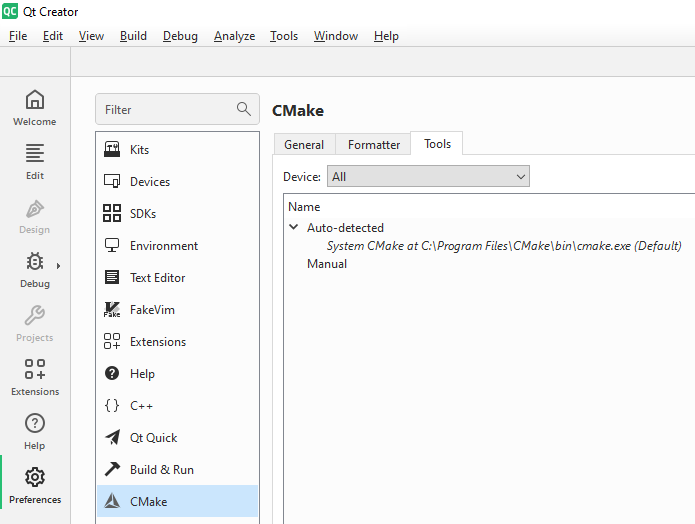
Step 5.1: Verify CMake Path Шаг 5.1: Проверка пути к CMake
In the Preferences menu, switch to the CMake tab. Because we added CMake to the system PATH during its installation, Qt Creator will automatically detect it. Look at the list to verify that an auto-detected entry pointing to your cmake.exe is visible:
В меню настроек перейдите на вкладку CMake. Так как мы добавили CMake в системный PATH во время его установки, Qt Creator определит его автоматически. Проверьте список, чтобы убедиться в наличии автоматически обнаруженной записи, указывающей на cmake.exe:
- Name: Typically listed under
System CMakeorAuto-detectedName: Обычно отображается какSystem CMakeилиAuto-detected - Path: Should automatically point to
C:\Program Files\CMake\bin\cmake.exePath: Должен автоматически указывать наC:\Program Files\CMake\bin\cmake.exe
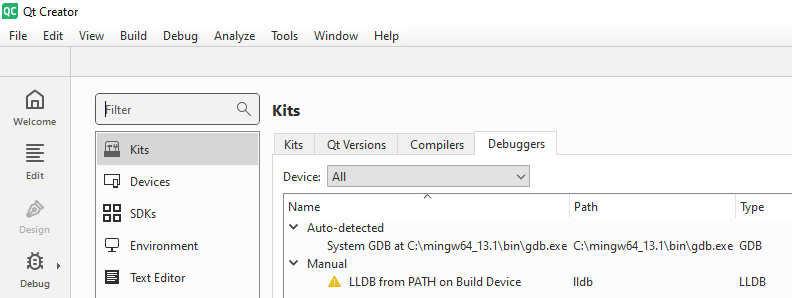
Step 5.2: Verify the Debugger Шаг 5.2: Проверка отладчика
Switch to the Kits > Debuggers tab. Because MinGW is in your system PATH, Qt Creator will automatically discover the GNU debugger. Verify that an auto-detected GDB entry is listed: Перейдите на вкладку Kits > Debuggers. Поскольку MinGW находится в системном PATH, Qt Creator автоматически обнаружит отладчик GNU. Убедитесь, что автоматически обнаруженная запись GDB присутствует в списке:
- Name: Typically listed under
Auto-detectedasGDBName: Обычно отображается в разделеAuto-detectedкакGDB - Path: Should automatically point to
C:\mingw64_13.1\bin\gdb.exePath: Должен автоматически указывать наC:\mingw64_13.1\bin\gdb.exe
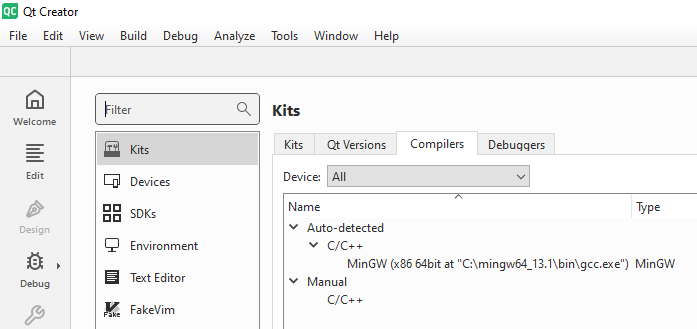
Step 5.3: Verify GCC Compiler Components Шаг 5.3: Проверка компонентов компилятора GCC
Switch to the Kits > Compilers tab. Look under the Auto-detected section to verify that the GCC (MinGW) compiler components for both C and C++ are recognized: Перейдите на вкладку Kits > Compilers. Загляните в раздел Auto-detected, чтобы убедиться, что компоненты компилятора GCC (MinGW) для C и C++ успешно распознаны:
-
C Language: Automatically detected entry pointing to
C:\mingw64_13.1\bin\gcc.exeЯзык C: Автоматически обнаруженная запись, указывающая наC:\mingw64_13.1\bin\gcc.exe -
C++ Language: Automatically detected entry pointing to
C:\mingw64_13.1\bin\g++.exeЯзык C++: Автоматически обнаруженная запись, указывающая наC:\mingw64_13.1\bin\g++.exe
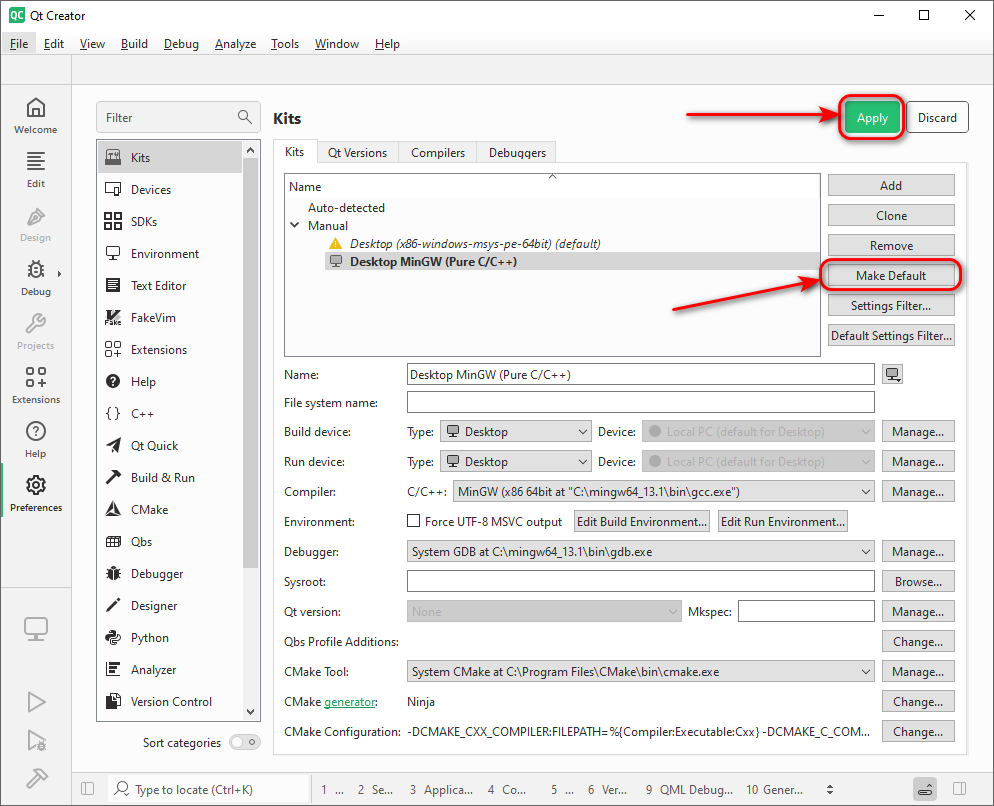
Step 5.4: Create a Custom Kit for Pure C/C++ Шаг 5.4: Создание пользовательского Kit для чистой разработки на C/C++
Now, switch to the Kits > Kits tab. While the components are auto-detected, we need to explicitly combine them into a profile that bypasses the Qt Framework. Click the Add button on the right and configure the following settings: Теперь перейдите на вкладку Kits > Kits. Несмотря на то, что компоненты определились автоматически, нам нужно явно объединить их в профиль, который работает в обход фреймворка Qt. Нажмите кнопку Add справа и установите следующие настройки:
- Name:
Desktop MinGW (Pure C/C++)Name:Desktop MinGW (Pure C/C++) - Build device: DesktopDevice type: Desktop
- Run device: DesktopDevice type: Desktop
- Compiler C/C++: Select the auto-detected
MinGWCompiler C: Выберите автоматически обнаруженныйMinGW - Debugger: Select the auto-detected
System GDBentryDebugger: Выберите автоматически обнаруженныйSystem GDB - CMake Tool: Select the auto-detected
System CMakeentryCMake Tool: Выберите автоматически обнаруженныйSystem CMake - Qt Version: Select
None(Crucial for a lightweight workspace entirely independent of the Qt framework)Qt Version: ВыберитеNone(Это принципиально важно для легковесного окружения, полностью независимого от фреймворка Qt)
Click Apply and then Make Default. Your environment is perfectly tailored for lightweight, pure C and C++ development with CMake! Нажмите Apply, а затем Make Default. Ваше рабочее окружение полностью готово для легковесной, чистой разработки на C и C++ с использованием CMake!
Support My Work Поддержать проект
If these tutorials helped you, consider buying me a coffee! Если эти туториалы вам помогли, вы можете поддержать автора.
Sberbank (Russia only) Сбербанк (только для РФ)

Direct transfer via phone number (Russia only) Перевод по номеру телефона (только для РФ)
USDT TRC20

Support via Cryptocurrency Поддержка криптовалютой