SDL3 & GLES 3.0: WebAssembly Font Rendering with SDL3_ttf SDL3 и GLES 3.0: Рендеринг шрифтов в WebAssembly с помощью SDL3_ttf
A guide to loading font files and rendering text using SDL3_ttf and OpenGL ES 3.0 for browser deployment. Руководство по загрузке файлов шрифтов и рендерингу текста с помощью SDL3_ttf и OpenGL ES 3.0 для запуска в браузере.
1. Obtain SDL3 and SDL3_ttf for Wasm 1. Получение SDL3 и SDL3_ttf для Wasm
- Build SDL3 for your Wasm environment: Building SDL3 for WebAssembly. Соберите SDL3 для вашей Wasm-среды: Сборка SDL3 для WebAssembly.
- Build SDL3_ttf using the library you just created: Building SDL3_ttf for WebAssembly. Соберите SDL3_ttf, используя библиотеку, которую вы только что создали: Сборка SDL3_ttf для WebAssembly.
2. Obtain cglm 2. Получение cgl
-
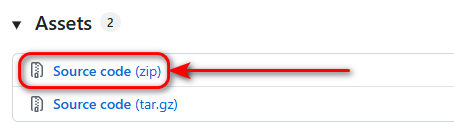
Download the Source code (zip) (cglm) from the official GitHub releases:
Скачайте Source code (zip) (cglm) с официальных релизов GitHub:
-
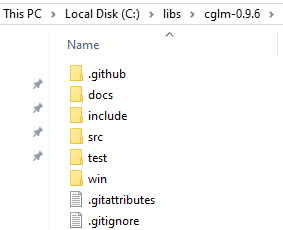
Extract it to a folder (e.g.,
C:/libs). Распакуйте архив в папку (например,C:/libs).
3. Assets 3. Ресурсы
Before creating the files, download the required asset: Перед созданием файлов скачайте необходимый ресурс:
- Download the TTF file: LiberationSans-Regular.zip Скачайте TTF-файл: LiberationSans-Regular.zip
- Note: This is a free file taken from this link. Примечание. Это бесплатный файл, который был взят по ссылке.
4. Project Architecture 4. Архитектура проекта
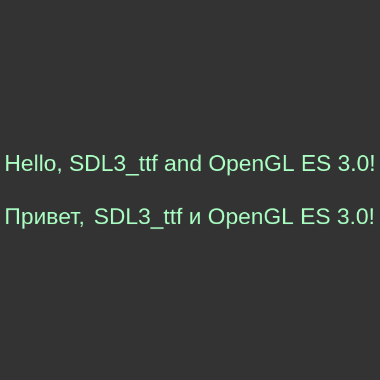
Let's create a project that draws a text using SDL3_ttf and OpenGL.
Давайте создадим проект, который рисует текст с помомощью SDL3_ttf and OpenGL.
C Project: Create an empty folder named text-2d-sdl3-ttf-opengl-wasm-c and set up the following hierarchy by creating new CMakeLists.txt and main.c files:
Проект на C: Создайте пустую папку с именем text-2d-sdl3-ttf-opengl-wasm-c и подготовьте следующую иерархию, создав файлы CMakeLists.txt и main.c:
text-2d-sdl3-ttf-opengl-wasm-c/
├── config-wasm.bat
├── build-wasm.bat
├── CMakeLists.txt
├── assets/fonts/
│   └── LiberationSans-Regular.ttf
├── public/
│   └── index.html
└── src/
    └── main.c
C++ Project: Create an empty folder named text-2d-sdl3-ttf-opengl-wasm-cpp and set up the following hierarchy by creating new CMakeLists.txt and main.cpp files:
Проект на C++: Создайте пустую папку с именем text-2d-sdl3-ttf-opengl-wasm-cpp и подготовьте следующую иерархию, создав файлы CMakeLists.txt и main.cpp:
text-2d-sdl3-ttf-opengl-wasm-cpp/
├── config-wasm.bat
├── build-wasm.bat
├── CMakeLists.txt
├── assets/fonts/
│   └── LiberationSans-Regular.ttf
├── public/
│   └── index.html
└── src/
    └── main.cpp
5. CMake Configuration 5. Конфигурация CMake
C Project: Copy and paste the following code into the CMakeLists.txt file:
Проект на C: Скопируйте и вставьте следующее содержимое в файл CMakeLists.txt:
C++ Project: Copy and paste the following code into the CMakeLists.txt file:
Проект на C++: Скопируйте и вставьте следующее содержимое в файл CMakeLists.txt:
6. Source Code 6. Исходный код
src/main.c (or src/main.cpp):
public/index.html:
6. Automation Scripts (.bat) 6. Скрипты автоматизации (.bat)
config-wasm.bat
emcmake cmake -S . -B dist/web
build-wasm.bat
cd dist\web
cmake --build .

cd ..\..
mkdir public\js
set current_dir=%~dp0
copy "%current_dir%dist\web\app.wasm" "%current_dir%public\js"
copy "%current_dir%dist\web\app.js" "%current_dir%public\js"
7. Build and Run 7. Сборка и запуск
Configure and build the project: Сконфигурируйте и соберите проект:
# Configure
config-wasm

# Build
build-wasm
Now, start your local server: Теперь запустите локальный сервер:
# Option 1: Using Node.js (http-server)
http-server -c-1

# Option 2: Using Python
python -m http.server 80808. Source Code 8. Исходный код
You can explore the source code and download the complete project directly from the GitHub repository: Вы можете изучить исходный код и скачать готовый проект напрямую из репозитория на GitHub:
Support My Work Поддержать проект
If these tutorials helped you, consider buying me a coffee! Если эти туториалы вам помогли, вы можете поддержать автора.
Sberbank (Russia only) Сбербанк (только для РФ)
Direct transfer via phone number (Russia only) Перевод по номеру телефона (только для РФ)
USDT TRC20

Support via Cryptocurrency Поддержка криптовалютой